Transcription
How to Transcribe a Voice Memo on iPhone (Every Method, Step by Step)
Updated · 9 min read
To transcribe a voice memo on iPhone, open the recording in Voice Memos, tap the More button (•••) and choose View Transcript or Copy Transcript — the transcript is created automatically on iPhone 12 or later in supported languages. If you need speaker names, a summary or action items, export the memo with Share → Save to Files and import it into a transcription app. Below are all four methods, what each one can and can’t do, and fixes for when the transcript doesn’t show up.
Method 1: The built-in Voice Memos transcript
Since iOS 18, Voice Memos turns speech into text on its own. According to Apple’s iPhone User Guide (checked November 2026), transcription works on iPhone 12 or later in English (all variants), Spanish, Portuguese, Italian, French, German, Japanese, Korean, Simplified Chinese and Traditional Chinese, and it is not available in all countries or regions. It is free and nothing has to be switched on. Older recordings made on iOS 17 or earlier are transcribed automatically the first time you open them, as long as they contain speech.
View or copy the transcript after recording
Open the recording
Open Voice Memos (it lives in the Utilities folder unless you moved it) and tap the recording you want.
Tap the More button (•••)
You get two transcript options: View Transcript and Copy Transcript.
Copy all of it, or just a part
Choose Copy Transcript to copy everything. To copy a passage, choose View Transcript, select the text, then tap Copy.
Paste it where you need it
Paste into Notes, Mail, a Pages or Google Doc, or a message. The transcript is plain text: no timestamps and no speaker names.
Watch the transcript live while you record
Tap the red Record button, swipe up from the top of the waveform, then tap the Transcription button. The waveform is replaced by live text with the current word highlighted. Tap the same button to go back to the waveform, and tap Done to save. This is the quickest way to check that the iPhone is actually hearing the speaker before you’re 40 minutes in.
Search inside transcripts
In the Voice Memos list, tap the Search button and type a word — say “invoice” or “Dr. Patel”. The list narrows to recordings with that word in the title or the transcript. Tap a match in the transcript and the playhead jumps to that point in the audio, so you can listen to the exact sentence.
Method 2: Summarize the transcript with Apple Intelligence
Voice Memos doesn’t have its own summary button, but if your iPhone supports Apple Intelligence you can use Writing Tools on the transcript: open View Transcript, select the text, and choose to summarize it in Writing Tools. Apple notes that Apple Intelligence on iOS 27 needs an iPhone 15 Pro, iPhone 15 Pro Max, or iPhone 16 or later, isn’t available in all languages or regions, and may have usage limits.
A summary is great for a five-minute idea dump. It is less useful for a 45-minute client interview, where you also want to know who said what and which tasks were agreed.
Method 3: Record in the Notes app instead
The Notes app can also record and transcribe, and it has one extra trick: a Summary button for recordings on Apple Intelligence iPhones. The language and device requirements are the same as Voice Memos (iPhone 12 or later, the same ten languages). Use it when you want the recording to sit next to your typed notes.
Start a recording in a note
Open a note, tap the Attachments button, then Record Audio, then the record button. Swipe down to type notes while it records.
Review the transcript
Tap the recording, then the transcript button. Tap any sentence to hear that moment.
Search, copy or summarize
From the More menu choose Find in Transcript, Add Transcript to Note or Copy Transcript. On Apple Intelligence iPhones, tap the recording, then Summary.
Method 4: Export the memo and import it into a transcription app
Apple’s transcripts are a single block of text. When the memo is a conversation — an interview, a doctor’s appointment, a meeting you recorded on your phone — you usually want speaker labels, timestamps, a summary and the follow-ups pulled out. That takes a dedicated app, and getting the memo there is simple.
Step 1: Export the memo as an .m4a file
Open the memo and tap Share
In Voice Memos, tap the recording, tap the More button (•••), then Share.
Keep it “Rendered”
Under Options, leave Rendered selected. That makes one .m4a file with any layers and effects mixed in. Editable creates a QuickTime Audio file that most transcription tools won’t open.
Send it straight to the app, or save it
Pick the transcription app in the share sheet if it appears there. Otherwise scroll down, tap Save to Files, choose a folder (e.g. iCloud Drive → Interviews), and tap Save.
Step 2: Import it
In AI Note Taker for iPhone, there are two ways in. From Voice Memos, choose AI Note Taker in the share sheet; the file is saved and the import starts when you open the app. Or, in the app, tap the import button (the tray with a down arrow, next to the microphone at the top of the Meetings list) and pick the file from Files. It accepts MP3, M4A, WAV, AAC, WebM, OGG, MP4, MOV and M4V up to 500 MB, which covers hours of a normal voice memo.
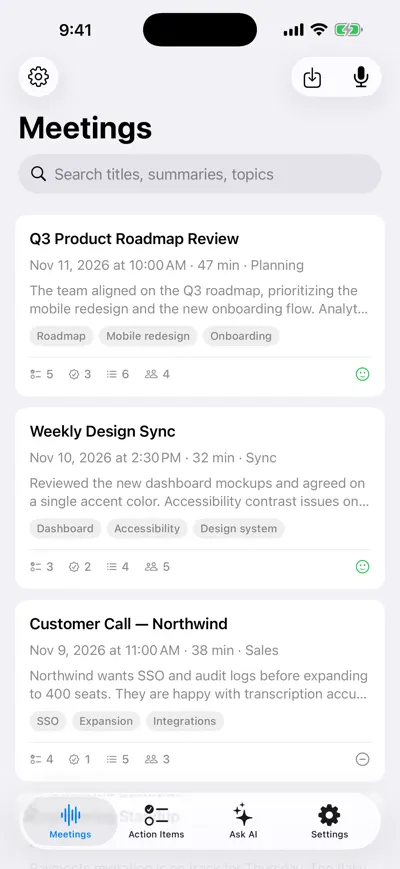
Import button at top right
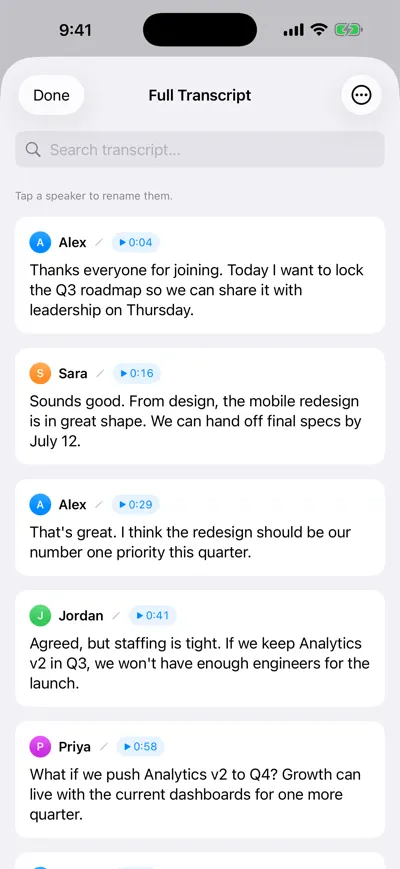
Transcript split by speaker
The imported memo gets a transcript split by speaker (tap a name like “Speaker 2” to rename it), plus an AI analysis with a summary, sentiment, topics and action items. Two honest caveats: transcription and analysis are English only for now, and imported files are processed as part of an AI analysis — the Free plan includes one analysis, and Pro ($19.99/month or $99.99/year) is unlimited. See pricing.
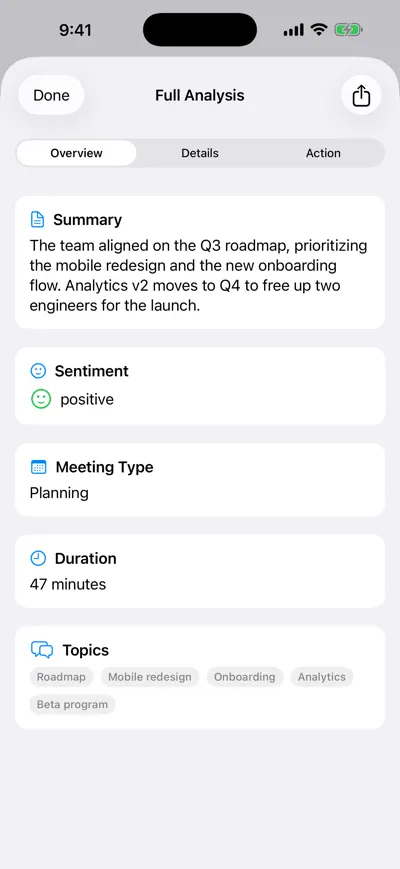
Summary, sentiment and topics
The same import works for Zoom and Teams files — see how to transcribe a meeting recording.
Which method should you use?
| Voice Memos transcript | Apple Intelligence summary | Notes recording | Transcription app (import) | |
|---|---|---|---|---|
| Cost | Free | Free (usage limits may apply) | Free | Varies; AI Note Taker: 1 free analysis, then Pro |
| Devices | iPhone 12 or later | iPhone 15 Pro or iPhone 16 and later | iPhone 12 or later | Any iPhone that runs the app |
| Speaker labels | No | No | No | Yes |
| Summary | No | Yes | Yes (Apple Intelligence iPhones) | Yes, plus action items |
| Works on existing memos | Yes | Yes, via Writing Tools | No — record in Notes | Yes |
| Search | Across all memos | — | Within one transcript | Across all recordings |
| Languages | 10 languages | Apple Intelligence languages | 10 languages | AI Note Taker: English |
Rule of thumb: for a note to yourself, the built-in transcript is all you need. For anything with two or more people that leads to decisions or tasks, import it.
Troubleshooting: when the transcript doesn’t work
- No “View Transcript” or “Copy Transcript” option. Check you’re on iOS 18 or later and an iPhone 12 or newer. Then check Settings → General → Language & Region: your iPhone language must be one of the supported ten, and the feature isn’t offered in every region.
- The memo is in a different language from your iPhone. Transcription follows the language it detects and supports. A Hindi or Arabic memo won’t get a transcript; export it to a tool that supports that language.
- Garbled or wrong-language text. Usually caused by mixed languages or heavy background noise. Re-record key parts closer to the speaker, or use a dedicated app.
- An old memo shows no transcript. Open it and give it a moment — memos from iOS 17 or earlier are transcribed when opened. If it stays empty, Apple Community users report that Duplicate (from the ••• menu) and opening the copy can kick it off; that is a workaround, not an official fix.
- Long memo, empty or partial transcript. Give it time and reopen the memo later. For multi-hour recordings, duplicating the memo and trimming each copy into parts (Edit Recording → Trim), or importing the file into a transcription app, is more dependable.
- Transcript but no speakers. That’s expected — Apple doesn’t label speakers. Use Method 4.
Tips for voice memos that transcribe well
Before you hit record
- Turn on Voice Isolation: with Voice Memos open, open Control Center, tap Voice Memos at the top, and choose Voice Isolation.
- Put the phone within about an arm’s length of the main speaker, bottom edge (the microphone) toward them.
- Lay it on a folded napkin or notebook, not a hard table that picks up taps and cup noise.
- Turn on Do Not Disturb so notification sounds don’t land in the audio.
- In a conversation, say names early: “Thanks, Priya — over to you, Marcus.” It makes speaker labels easier to rename later.
- Say the date and topic at the start (“March 4, kitchen remodel call with Dana”) so search finds it later.
- Ask before recording anyone else. Consent rules vary by place — this isn’t legal advice, so check local law.
- Rename the memo right after you stop; “New Recording 47” is hard to find in a month.
Frequently asked questions
Let AI take the notes for you
AI Note Taker records and transcribes your meetings, then writes the summary, decisions and action items. Free to start, no install needed.