Transcription
How to Transcribe a Webex Meeting: Recording, AI Assistant and Free Options
Updated · 9 min read
To transcribe a Webex meeting, the host clicks Record and chooses the cloud; after the meeting Webex builds a recap with the transcript, summary, action items and chapters, and emails the host a link. That needs a paid Webex plan, a Webex Suite meeting and AI features switched on by your admin. If you are on Webex Free or attending someone else’s meeting, there are two other routes: download the closed-captions transcript before the meeting ends, or record on your own device with an app like AI Note Taker. Below are the exact steps for each, and which plan unlocks what.
What each Webex plan lets you do
Prices from Webex’s US pricing page at the time of writing (November 2026), billed annually. Regional prices differ, and enterprise contracts can enable or disable features individually, so your admin’s settings are what count.
| Plan | Price | Meeting length | Recording | Captions and transcript |
|---|---|---|---|---|
| Webex Free | $0 | Up to 40 minutes | On your computer only | Not listed as included |
| Webex Meet | $144 per license per year ($12/month) | Up to 24 hours | Computer and 10 GB cloud | Captions in English, French, German, Spanish; post-meeting transcript in English |
| Webex Suite (Meet + Call) | $270 per license per year ($22.50/month) | Up to 24 hours | Computer and 10 GB cloud | Same as Meet |
| Webex Enterprise | Contact sales | Up to 24 hours | Computer and unlimited cloud | Captions and transcript; AI Assistant listed as included |
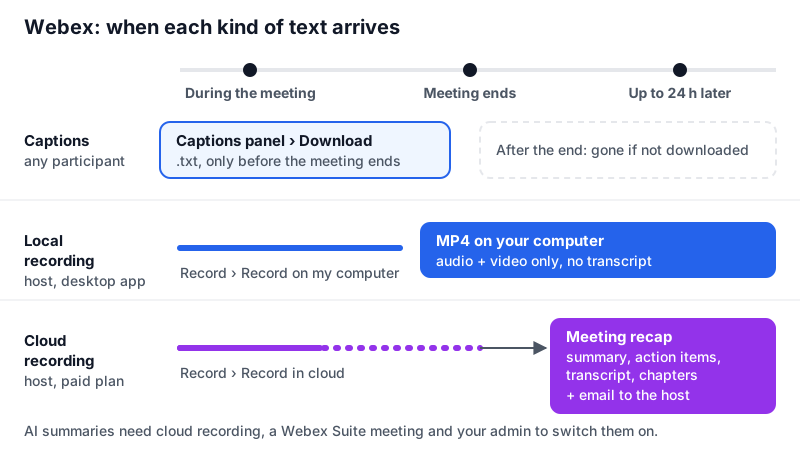
Method 1: Cloud recording with an AI recap (best for hosts)
This is how to transcribe a Webex meeting with the least effort, if you host on a paid plan. Requirements: you are the host, you choose the cloud option, the meeting runs on the Webex Suite meeting platform, and your admin has enabled AI summaries. Every participant must consent before the meeting is recorded, summarized or transcribed.
Click Record and choose the cloud
In the meeting controls, click Record and pick Record in cloud. Participants get an audio and visual notice, and a recording indicator appears at the top right.
Stop when you are done
Click Record again and select Stop recording. If the host drops out, a cohost takes over the host role and can record.
Wait for the recap
After the meeting, Webex generates a summary, action items, a transcript and chapters, and emails the host. Recordings can take up to 24 hours to appear.
Open it
Click View meeting recap in the email, or go to User Hub › Recordings, or in the Webex App go to Meetings › Meeting recap from the calendar or the meeting’s space.
Download the transcript
On desktop, open the recording and click Download meeting content. You can save the recording, AI summary, action items and transcript; the transcript downloads as a text file.
Before sharing the recording, hosts can edit the summary notes and add chapters. To hide the AI summary or chapters from viewers, use Edit › Panel Display Options and clear those boxes. You can share from User Hub to a Webex space or by email, or forward the recap.
Method 2: Download the captions as a transcript (no recording)
Webex lets you save a transcript without recording, which is handy when the host doesn’t want video stored. It needs a Webex Suite meeting and an admin who allows saving transcripts.
Turn on captions
Any participant can click Show closed captions at the lower left of the meeting window. On mobile, tap More options › Closed Captions and switch on Show closed captions. A blue dot and a notification tell everyone the transcript is being captured.
Keep the Captions panel available
If you can’t see it, open More panels and select Captions.
Download before the meeting ends
Click Download at the top of the Captions panel and choose a folder. You get a .txt file covering everything from when captions started until you click Download.
Method 3: Ask the AI Assistant during the meeting
Cisco’s AI Assistant is not a transcript, but it answers questions about what was said. Click the AI Assistant icon in the meeting controls to open the panel, then pick Catch me up (a summary of the last 15 minutes), Summarize more, Was my name mentioned or What are the action items. If you join late with meeting summaries on, a pop-up summarizes what you missed. It is off by default, works on Webex Suite meetings, and an admin must enable it in Control Hub; participants may need the host’s permission to turn it on.
Method 4: Record to your computer, then transcribe the MP4
This is the only built-in recording on Webex Free. You get an MP4 file and nothing else: no transcript, chat or participant list.
Use the desktop app
Local recording works only from the Webex desktop app. You can’t record from the web app (for example on a Chromebook) or in a meeting you started by phone.
Click Record › Record on my computer
Only computer audio is captured, so people who dialed in with Call me or Call in won’t be on the file.
Find the MP4
Check the folder set in Preferences › Recordings in the desktop app. Defaults vary by version; on many installs it is a Webex Recordings folder in Documents (Windows) or your home folder (Mac).
Transcribe it
Import the MP4 into AI Note Taker (Import a recording, files up to 500 MB) for a speaker-separated transcript and summary. More tips in how to transcribe a meeting recording.
Method 5: Bot-free transcription when you aren’t the host
Attendees can’t record a Webex meeting; Webex’s own advice is to ask the host. If the host says no, accept it. If they are fine with notes but don’t want to set anything up, you can record on your own device with their consent.
Ask and get a yes
Webex’s own recording plays a notice; yours won’t. Ask at the start, and say who will see the notes.
Use speakers so the mic hears everyone
AI Note Taker records your microphone, not your computer’s sound output. Turn off headphones, or put your iPhone next to the laptop speaker.
Record in AI Note Taker
Click New Recording in the browser, or use the iPhone app. The transcript fills in live; nothing joins the Webex meeting.
Turn it into notes
Rename speakers, then use the AI analysis for a summary, decisions and action items, and Ask AI to search across all your meetings later.
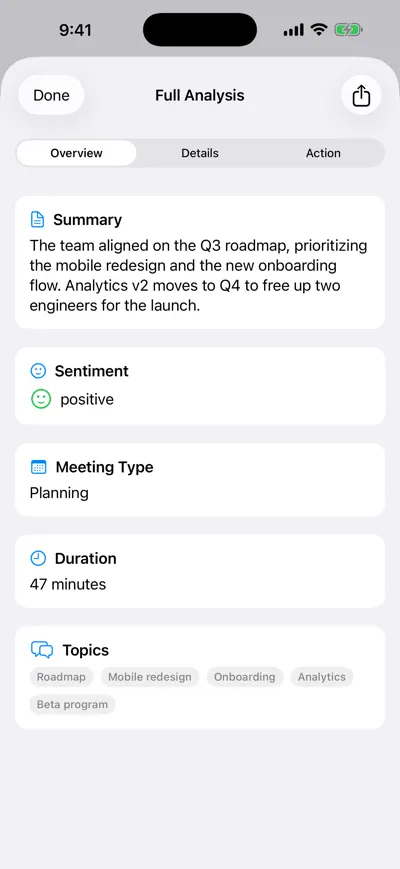
Summary of the recorded call
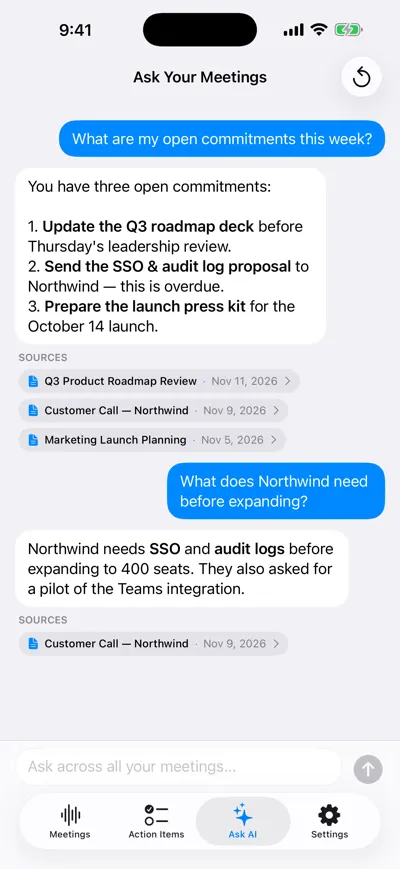
Ask questions across meetings
Limits to know: AI Note Taker doesn’t join Webex or read the participant list, it transcribes English only, and the free plan includes unlimited transcription plus 1 AI analysis; after that, summaries need Pro. Bot-based tools such as Fireflies list Webex among their supported platforms if you would rather have a visible attendee; see the best AI note takers.
Webex transcription methods compared
| Method | Cost | Who can use it | Bot visible? | Output |
|---|---|---|---|---|
| Cloud recording + AI recap | Paid plan; AI features as your plan and admin allow | Host (or cohost standing in) | No; recording notice | Recording, transcript, summary, action items, chapters |
| Captions download | Webex Suite meeting, admin must allow saving | Any participant can turn captions on | No; blue-dot notice | .txt transcript of the captioned part |
| AI Assistant in meeting | Where enabled by admin | Participants, if the host allows | No | On-demand recaps, no file |
| Local recording | Included, also on Free | Host, desktop app | No; recording notice | MP4 to transcribe yourself |
| Bot note taker | Vendor free tier or paid plan | Anyone whose bot is admitted | Yes | Transcript and notes in the vendor’s app |
| AI Note Taker on your device | Free unlimited transcription; AI analysis on Pro | Anyone, including attendees | No; you announce it | Speaker-labeled transcript, summary, action items |
Common Webex transcription problems
- No AI summary on my recording: it was saved to your computer, not the cloud; the meeting wasn’t on the Webex Suite platform; or your admin hasn’t enabled AI summaries.
- Recording isn’t in User Hub yet: cloud recordings can take up to 24 hours. Also check Calendar › Completed, where recorded meetings carry a Recording label.
- Dial-in voices missing from the MP4: local recordings only capture computer audio. Use cloud recording if people call in by phone.
- Captions Download button missing: the meeting isn’t on Webex Suite, or your admin turned off saving transcripts or the Captions panel.
- Transcript in the wrong language: on Meet and Suite plans, post-meeting transcripts are English only according to Webex’s plan page.
- Meeting cut off at 40 minutes: that is the Webex Free limit. Book two back-to-back meetings and record each one, or move the call to a paid host.
Using other platforms too? See how to transcribe Google Meet, how to transcribe a Microsoft Teams meeting and the shorter overview in how to record and transcribe a Zoom meeting. Consent rules vary by country and state, and this isn’t legal advice: see is it legal to record a meeting.
Frequently asked questions
Let AI take the notes for you
AI Note Taker records and transcribes your meetings, then writes the summary, decisions and action items. Free to start, no install needed.